

Building a ChatGPT App with Next.js 16.1and MCP

Search for a command to run...
No comments yet. Be the first to comment.
The call came at 5:14 AM. A bearing on production line 7 had failed, and the plant manager wanted to know why our "predictive maintenance system" hadn't caught it. I spent the next four hours tracing data from the dashboard back through our pipelines...

Ready to build data lineage diagrams that actually get used? This release is all about getting you and your team productive instantly. We've shipped production-ready templates, made drawing as intuitive as Draw.io, and created a dashboard experience ...

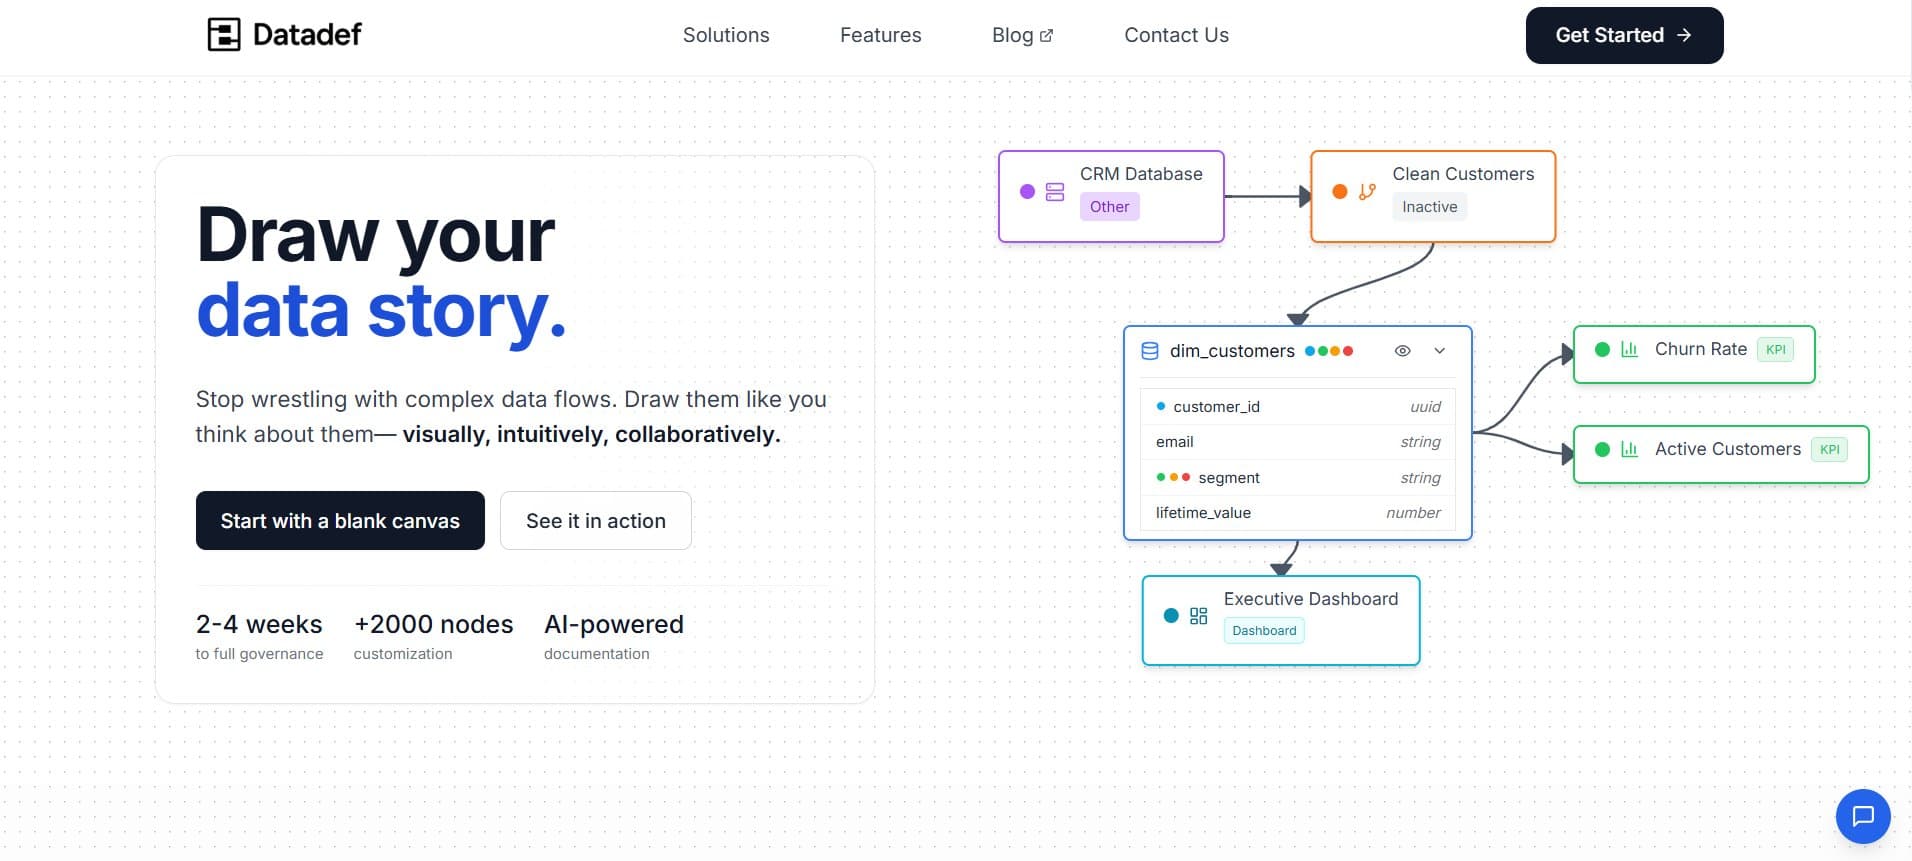
I've been building software for long enough to know that the features you think will change everything usually don't, and the ones that actually do change everything are the ones you barely thought about when you shipped them. Case in point: Datadef'...

Introduction In most companies, the architecture of project management instruments usually revolves around elements like tasks, milestones, and timelines. These tools, though very effective in delivering software products or handling general business...
I spent the last few days building a ChatGPT App for Datadef. The Model Context Protocol (MCP) is powerful—it basically lets you turn ChatGPT into a host for your own interactive apps—but the documentation is still a bit scattered.
This is a breakdown of what I learned while getting it to work, from the initial setup to the weird debugging hurdles you'll likely hit.
These are the docs I kept open the whole time. They’re the best source of truth right now:
OpenAI Apps SDK Quickstart: Start here.
Building an MCP Server: The technical details of the protocol.
App Submission Guidelines: Good to read early so you don't have to rewrite things later.
There are two main parts to a ChatGPT App:
Tools: These are the actions ChatGPT can take. When a user asks for something, ChatGPT sends a JSON request to your /mcp endpoint.
Resources: This is the UI. Your tool returns a URI, and ChatGPT fetches the HTML to render it in a sandbox.
The Flow:
User prompt triggers a tool call.
Your server runs the handler and returns structuredContent (data for the widget) and _meta.
ChatGPT loads the HTML (served as text/html+skybridge).
The Widget Runtime passes the data into your code via window.openai.
The Iframe Approach: The ChatGPT sandbox is very restrictive. To get around this, I serve a tiny HTML wrapper that just loads my "real" app inside an <iframe>. This lets me use my normal tech stack while still living inside the ChatGPT interface.
The MCP SDK is moving fast, so I'd recommend pinning these versions to avoid breaking changes:
npm install mcp-handler@1.0.2 @modelcontextprotocol/sdk@1.20.0
Note: There is a Vercel starter out there, but I found it easier to build from scratch since the SDK updates so frequently. (https://github.com/vercel-labs/chatgpt-apps-sdk-nextjs-starter)
ChatGPT needs an HTTPS endpoint to talk to. I use a VPS with nginx and an SSH tunnel to point traffic to my local machine. So basically it does : ChatGPT → Cloudflare redirects DNS like XXXX.domain.com → VPS → Nginx to specific local port → My local machine with a SSH reverse proxy.
The Tunnel:
# Run this locally to map your VPS port to your local dev server
ssh -R 8888:localhost:3000 -N -o ServerAliveInterval=30 user@your-vps-ip
You need to set specific headers so OpenAI can embed your app. Here’s what my next.config.js looks like:
async headers() {
  return [
    {
      source: '/mcp',
      headers: [
        { key: 'Access-Control-Allow-Origin', value: '*' },
        { key: 'Access-Control-Allow-Methods', value: 'GET,POST,OPTIONS' },
        { key: 'Access-Control-Allow-Headers', value: '*' },
      ],
    },
    {
      source: '/:path*',
      headers: [
        { key: 'X-Frame-Options', value: 'ALLOWALL' },
        {
          key: 'Content-Security-Policy',
          value: "frame-ancestors 'self' https://*.openai.com https://*.oaiusercontent.com https://*.web-sandbox.oaiusercontent.com"
        },
      ],
    },
  ];
}
In Next.js, you'll handle everything in app/mcp/route.ts. This is where you define your tools and resources.
import { createMcpHandler } from "mcp-handler";
import { z } from "zod";

const handler = createMcpHandler(async (server) => {
  // 1. The UI Resource
  server.registerResource(
    "my-app-ui",
    "ui://widget/view.html",
    {
      title: "App View",
      mimeType: "text/html+skybridge",
      _meta: {
        "openai/widgetPrefersBorder": true,
        "openai/widgetDescription": "Interactive viewer",
        "openai/widgetDomain": "https://your-app.com",
        "openai/widgetCSP": {
          connect_domains: ["https://api.your-app.com"],
          resource_domains: ["https://static.your-app.com"],
          frame_domains: ["https://your-app.com"],
        }
      }
    },
    async () => ({
      contents: [{
        uri: "ui://widget/view.html",
        mimeType: "text/html+skybridge",
        text: createIframeWrapper("https://your-app.com/embed"),
      }]
    })
  );

  // 2. The Tool
  server.registerTool(
    "create_something",
    {
      description: "Creates a visualization",
      inputSchema: { prompt: z.string() },
      _meta: {
        "openai/outputTemplate": "ui://widget/view.html",
        "openai/toolInvocation/invoking": "Generating...",
        "openai/toolInvocation/invoked": "Ready!",
        "openai/resultCanProduceWidget": true,
        "openai/widgetAccessible": true,
      }
    },
    async ({ prompt }) => ({
      content: [{ type: "text", text: `Generating: ${prompt}` }],
      structuredContent: { prompt },
      _meta: { "openai/outputTemplate": "ui://widget/view.html" }
    })
  );
});

export const GET = handler;
export const POST = handler;
The createIframeWrapper function returns the HTML that ChatGPT renders. It grabs the data from ChatGPT and passes it to your app via URL parameters.
window.openaiInside the sandbox, you get a window.openai object. This is how you talk to the host:
toolOutput: The data your tool just returned.
widgetState: State that persists between turns.
callTool(name, args): Trigger other tools from your UI.
openExternal(url): Open links outside the chat.
function createIframeWrapper(appUrl) {
  return `
    <!DOCTYPE html>
    <html>
      <body style="margin:0; padding:0; overflow:hidden;">
        <iframe id="frame" style="width:100vw; height:100vh; border:none;"></iframe>
        <script>
          const frame = document.getElementById('frame');

          // Get data from OpenAI
          const output = window.openai?.toolOutput || {};
          const prompt = output.structuredContent?.prompt || '';
          frame.src = \`\${appUrl}?prompt=\${encodeURIComponent(prompt)}\`;

          // Listen for updates if the user asks for changes
          window.addEventListener('openai:set_globals', (e) => {
            const newPrompt = e.detail?.globals?.toolOutput?.structuredContent?.prompt;
            if (newPrompt) frame.src = \`\${appUrl}?prompt=\${encodeURIComponent(newPrompt)}\`;
          });
        </script>
      </body>
    </html>
  `;
}
Testing can be slow if you keep starting new chats. Here’s how I sped it up:
Developer Mode: Enable this in ChatGPT settings to add your local server.
The Reload Button: You don't need a new chat for every change. Just click the "Reload" icon on your app in the sidebar to refresh tool definitions.
Inspect Element: You can right-click the widget in ChatGPT and "Inspect" it. This is the only way to see console logs from your wrapper.
Blank Widgets: Usually a CSP issue. Check the console for frame-ancestors errors.
CORS Errors: ChatGPT sends OPTIONS requests. If your proxy or server isn't handling preflight, it will fail.
MIME Types: If you don't use text/html+skybridge, ChatGPT will just show your HTML as a code block.
Auth: If your app needs a login, the iframe might get stuck. I usually serve a public "viewer" route and pass a token in the URL.
When you're ready to submit to the OpenAI App Store, keep these in mind:
OpenAI uses these to decide how to treat your tools:
readOnlyHint: For tools that don't change data.
openWorldHint: For tools that touch external APIs.
destructiveHint: For tools that delete things (triggers a confirmation).
Domain Verification: You need to host a token at /.well-known/openai-apps-challenge.
Tool Descriptions: Be very specific. The model needs to know exactly when to use your tool.
Privacy Policy: You'll need a hosted policy on your domain.
Building an MCP app is a bit different from standard web dev, but once you get the tunneling and the iframe wrapper working, it opens up a lot of possibilities.
If you're looking for more examples, check out the Vercel MCP Starter or the official OpenAI docs.
Happy building!
Theo - Founder of Datadef